
The roofing structure comprises of different components or roofing materials that guard the entire building from harsh climatic conditions in order to extend the life of the building. Drip edges just like gutters are one of the components that make up the roofing structure to aid the channeling of water out of the main building.
What is a drip edge?
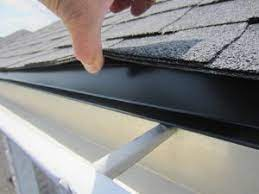
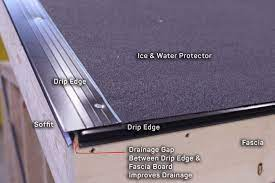
Drip edge is an external (exposed) flashing made up of metal that is installed at the edges of a roof on top of the fascia to channel rainwater away from the fascia. A drip edge plus a gutter creates a complex roofing structure that will stand the taste of time.
What Types/Kinds of Drip Edges are available in the market?
Drip edges are available in different shapes and colours. UyThey include:
- 1) L-style drip edge: Also known as C-style drip edge possesses a shape of letter L and due to its shape, it channels water away easily from the roof decking. C-style drip edges are best for roofs without fascia boards. Some part of this drip edge is under the roof while some other part is on top of the fascia, forming a 90-degree angle.
- 2) T-style drip edge: This is a complex and advanced drip edge that provides extreme protection to the fascia. T-style drip edges form a triangular shape between the deck and the building. It is also known as D-style drip edge.
- 3) F-style drip edge: This has a longer drip edge than other styles. Apart from the good protection it provides to roofs, it helps you attach new drip edges on the existing shingles. It is also known as gutter apron.
Materials used in Drip edge construction

Drip edges don’t just have different shapes and colours. It is constructed with different construction materials, such as:
- 1) Galvanized steel: It is galvanized due to a thin layer of zinc is costed on steel to form a corrosion resistant kind of steel. Galvanized steel drip edges are really heavy and require people with good manpower for installation.
- 2) Aluminum: Aluminum is frequently used in constructing roofing materials and drip edges are not exempted. Aluminum drip edges are lightweight, strong and super affordable.
- 3) Vinyl and fiberglass:Plastic materials are generally cheap and this is the case with vinyl roof drip edges. They are inexpensive and easy to install. The downside to these roof drip edges is they can break if not handled with care and harsh climates like high rainfall, UV rays will cause it to damage and degrade.Drip edges are constructed with other materials like copper, stainless steel, e.t.c but are not usually used for drip edge construction.
What is the importance of drip edges?
- 1) The prolong the life of the fascia: Drip edges direct water away from the fascia to the gutter system. Fascia exposure to water will cause it to rot. Drip edges are designed to withstand any kind of forces that can damage the fascia.
- 2) It avoids pest infestation: Humans and animals co-exist but unfortunately some of these animals can become a pest to us. Small animal pests can enter our houses from the gap between the roof deck and the fascia board. Drip edges cover that gap of the roof, preventing pests from entering your attic or home.
- 3) Protection against ice dams: Drip edges guard beneath the roof line during winter against ice dams that might drop and stick to the roof line, causing damages.
- 4) Protection against non-directional rainfall: Wind-driven rainfalls don’t have a specific direction. Wind causes water to be around the shingles. Drip edges can prevent Wind-driven rain from entering the roof deck.
What is the cost of installing a drip edge?
A drip edge is part of a roof replacement. The commonly used drip edge is aluminum drip edge, which cost $2.00 to $3.00 per linear foot. This includes the cost of installation. The installer or contractor has a great influence on the general price of installation.
Is Drip’s edge the same with a flashing?
Drip edges are usually confused with flashing but they are not the same. A flashing is the general term used in referring to any material used to avoid rain or snow from causing depreciation in a building.
Flashing is divided into internal flashing and external (exposed) flashing. Drip edge is an external flashing. In the sense that it is fixed on the exterior to protect the home on the outside while internal flashing is fixed on the interior to protect the house inside.
How to install a drip edge?

Drip edges are best for professional but that doesn’t mean you can’t do-it-yourself but you must have some technical skills and experience. Drip edge installation processes are different from eaves and rakes roof installation. Drip edges are installed on the roof eaves after preparing your roof for underlayment installment. After installing the underlayment, then install drip edges on the roof. To install a drip edge:
1)If you choose a C-style drip edge, you need to install a furring strip. Furring strips are strips of wood installed underneath the roof edge on the vertical section of the house roof. Install the roof edge over the strip.
2) Ensure you install drip edges on the eaves first. You must position the drip edge downward so water will drip into the gutters. The end of the drip edge should face down the roof.
3) Use nails specifically for roofing to hold the drip edge every 10-12 inches. Do not exceed more than this. More than 12 inches can result in improper installment. The next layer of drip edge will overlap the initial one by one inch.
4) You will meet an area where the eave and rake meet, place the drip edge on the rake edge. Then mark this point.
5) Mark another point on the drip edge and cut it out entirely, so that it can sit over the edge by an inch. Cut out the upper part of the initial point marked. Then make a transverse cut.
6) Install the drip edge. Make sure you curve its flap to form a corner.
7) After fixing the drip edge on the eaves, install the underlayment. Therefore, the underlayment will be on top of the drip edge which is on top of the eaves.
8) Use nails to fix the drip edge on the rake.
9) When you reach a spot where the rake and eave meet again, install the drip edge on the flap you left initially.
10) On the roof ridge, cut out another section in your drip edge. Place the drip edge on the ridge and mark the point the drip edge exceeds the roof. Cut from beneath of the drip edge.
11) To make the drip edge for over the ridge, fold it. Mark the center. Cut out the upper part of the drip edge on this line to create a smooth work. Fix a nail from the outside to hold the drip edge well.
If you don’t have any technical experience please leave installation for a professional.
Conclusion
Drip edges are not installed in every building and is not a must. Although some people claim that metal roofs do not necessarily need a drip edge, it is highly recommended to install a drip edge no matter the type of roof because it supports a gutter. A gutter can’t withstand every harsh climate, but with a gutter and a drip edge you are rest assured that your home is safe.
Related posts:
 How Long Does It Take to Build A Deck
 FIBERED VS NON FIBERED ROOF COATINGS
 Why are Japanese roofs curved up
 7 Best Roof Strap Gutter Hangers Today.
 8 Best Garage Door Repair Companies in Richmond
 How to Make Concrete Driveway Strips
 Common Incorrect Gutter Installation to look out for.
 SPLASH BLOCKS VS DOWNSPOUT EXTENSIONS: A QUICK GUIDE
