
Removing tile from a wall can be quite a task. It is also important to not damage the surface beneath the tiles because it will make it more difficult to fix. How do you remove tiles without breaking them? How do you know how much pressure to apply?
How long does it take? These are all questions that we answer in this article. We provide step-by-step instructions on how to remove tile without damaging your walls and other surfaces below them, as well as tips for what materials you might need before beginning work.
How long does it take?
How long it takes will depend on how many tiles need to come off, so we recommend that you start with removing only one row of tiles at first and work up until all are removed. If there is any leftover adhesive left over, then paint thinner can help dissolve the glue and make removal easier later on.
It takes about 15 minutes to remove one row of tiles and about one hour to remove an entire wall. But this depends on your experience, some people are able to do it in just a few minutes, while others may take hours.
Read: What does hail damage look like on your roof?
Tips for what materials you might need before beginning work.
The most important thing to remember is that you need the right tools, so make sure you have a pry bar and scraper before starting. You will also want thick gloves for protection against sharp edges of tiles. And don’t forget safety goggles!
Materials needed for removing tile from wall
- Floor Scraper
- Masonry Chisel
- Hammer
- Sledgehammer
- Air Hammer
- Jackhammer
- Demolition Fork
- Power Grout Removal Tool
- Wheelbarrow
- Safety Goggles
- Work Gloves
- Safety Mask
- Noise-canceling Headphones
Step by step guide on how to remove tiles from wall
The first thing to do is to make sure the area where you are removing tiles is clean and clear of any furniture or objects. Then, remove one row at a time in order to get started.
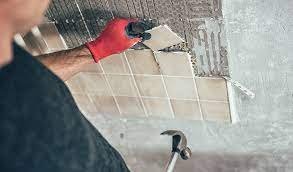
Using your pry bar, start at the top-left corner of the tile that needs removal by inserting it into this space at an angle so it will slide under the tile from left to right (or vice versa).
Once inserted, use your hands to lift up along with pushing down with pressure against both sides of the blade towards each other until you hear a ‘pop’. Now repeat this step for all tiles in that row before moving onto the next rows as needed.
Once done using your hands to pop out some adhesive from between two tiles, grab hold of your scraper tool and start scraping down the length of your finger over this adhesive so that it loosens up.
Once all of the tiles are removed clean up any debris with a vacuum cleaner and dustpan.
Once all tiles are removed, wipe away any remaining glue or mess with a damp cloth and then seal the area by painting on some light-bodied paint to protect against stains in the future. Now enjoy your newly bare space!
Safety tips to follow while removing tile from wall
It is important to always wear safety goggles when removing tiles from walls. Sharp edges can be found on the underside of some and these may cause injury if not protected against while working.
In addition, use thick gloves for protection against any sharp edges that might come in contact with your skin during removal. And don’t forget a respirator mask! Removing adhesive will release fumes so it’s best to protect yourself before beginning work by wearing one or both of these items as necessary.
How do you know how much pressure to apply?
This will depend on the type of adhesive that is holding your tiles in place. If you are removing glue, then use as much force as needed to pop out a tile and any leftover adhesive from beneath it. However, if there’s no adhesive left over, then all you need to do is apply light pressure while using your pry bar with a scraper tool for removal.
Now that you know how to remove tile from the wall, make sure the next time it’s necessary for you in order to save yourself a lot of headache and expense. Be careful when removing tiles on exterior surfaces as well because these might need more force than usual due to adhesive being stronger there. For any other questions please feel free to contact us or leave a comment below!
Read: Best Ladders for cleaning gutters according to science and research
How can I avoid damaging the surface beneath when removing tiles?
To avoid damaging the surface beneath the wall where the tiles need removal, you might want to cover up any surfaces that will be affected by adhesive. You can do this with a plastic or tarp as necessary and then remove it when finished working so no damage is done.
Conclusion
It’s a lot of hard work to remove tiles from the wall, but it can be achieved with patience and determination. How long the removal process takes depends on many factors such as how difficult adhesive is, what tools are used for removal, or whether you’re removing exterior panels that might need more force due to being stronger in adhesion there.
Related posts:
 High profile ridge cap vs low profile
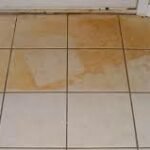 How to remove stains on bathroom tiles quickly
How Long Does It Take For Wood To Rot
How to remove stains on bathroom tiles quickly
How Long Does It Take For Wood To Rot
 SPLASH BLOCKS VS DOWNSPOUT EXTENSIONS: A QUICK GUIDE
How to Make a Room Cool Facing the Sun.
SPLASH BLOCKS VS DOWNSPOUT EXTENSIONS: A QUICK GUIDE
How to Make a Room Cool Facing the Sun.
 Best Ladder for Your Stairwell

1 thought on “How To Remove Tile From Wall Without Breaking It: A Step-by-Step Guide”