
If you’ve ever been in the market for a tortoise table but don’t know where to start, this article is for you. In it, we will cover everything from what a tortoise table is, why people use them, and how to build a tortoise table.
Tortoise tables are not just another thing that humans make as an accessory. They are highly necessary when proper planning is done before building one yourself or purchasing one online or at a store.
Tortoise tables have a wide-range of purposes, including:
- Providing a space for reptiles to rest and relax
- Giving tortoises a place to hide when they are feeling uncomfortable - they can climb into their tortoise table when they feel stressed, scared or out of place. Tortoises love dark and quiet areas. If they do not have an area that is quiet and dark, they may become nervous or agitated.
In some cases, tortoises may “hibernate” in their tortoise table if all other areas in their enclosure are not very comfortable.
- Giving your tortoise some privacy and providing a focal point for your reptile enclosure.
- Providing an area that is easy to clean, unlike the rest of the tortoise’s enclosure. This is important, especially if you have multiple tortoises or reptiles who poop a lot and require frequent cleaning.
What Is A Tortoise Table?
A tortoise table is a piece of equipment that is used to provide various uses for your reptile. The size or the dimensions of your tortoise table can differ from others, but what they all have in common is that they are not hard to build and are very easy to set up. Many of you reading this article may be curious as to “why” tortoise tables exist.
A tortoise table can provide a safe haven from predators, especially if there are other more vulnerable animals in their enclosure at the same time.
It is also important for tortoises to have a place on which to climb and rest during the day (especially if the temperature in their habitat varies greatly). Many tortoises like to climb high, but some are not very good at doing so. In these cases, a tortoise table is the perfect solution.
If you have multiple tortoises, having a tortoise table with steps is especially handy! It gives them a place to climb up and hang out at night and also in the day if they want to sleep there.
Tortoises are very active and curious creatures during the day, but they become tired as it gets later and night comes on.
When this happens, tortoises will sleep where ever is comfortable for them - especially if they are nervous or scared at the time. This means that if you do not provide a dark and private area for them to sleep in, then your reptile may feel uncomfortable or even become agitated.
This is why it is important to have one of these tables set up in their enclosure so that they can rest without feeling stressed.
All in all, tortoise tables serve as great additions for your reptile’s enclosure that could not be more simple or easy to build.
Why Use A Tortoise Table?
In many cases, you can use a tortoise table as your tortoises’ home area. If this is the case, it is important that you make sure that its size and dimensions suit specifically the needs of your reptile(s).
If you want to use your tortoise table as an extension of your reptile’s enclosure, then this is important. It must also allow for proper ventilation so that the tortoise can breathe properly. If a tortoise cannot breath properly and is forced to sleep in a poor-ventilated area, it can be unhealthy and may even have negative effects on the health of its internal organs.
If you are going to use your tortoise table as a place for your reptile to sleep at night, it is a good idea to have an area where the tortoise can climb into the table on a level that it may be slightly elevated. This will make it easier for your tortoise to climb up into it if necessary.
When building a tortoise table, find out how tall the tortoises are. The height should be appropriate for their size and developmental stage. For example, if your tortoises are younger and have not grown very much yet, then the height of the table won’t matter that much.
The size of the enclosure you need to create for your reptile will be related to the dimensions or size of your tortoise table as well as other factors such as light refraction, distance from front windows, thermal insulation in winter etc.
Moving on to the next topic, let’s discuss on the step-by-step processes on how to build a tortoise table.
How To Build A Tortoise Table
Here, we will be discussing on the step-by-step processes on how to build a tortoise table. This steps are as follows:
Step 1. Planning Your Tortoise Table

Planning your tortoise table is an essential aspect of the construction process that requires a great deal of consideration. It is important to carefully plan each and every step so that you end up with a highly functional, attractive tortoise table.
Some things to bear in mind when planning your tortoise table are:
- The length of your new table should be in accordance with the size and height of your reptiles, especially if you are using it as place for them to sleep at night. Make sure that it is also wide enough for them to get into without being cramped.
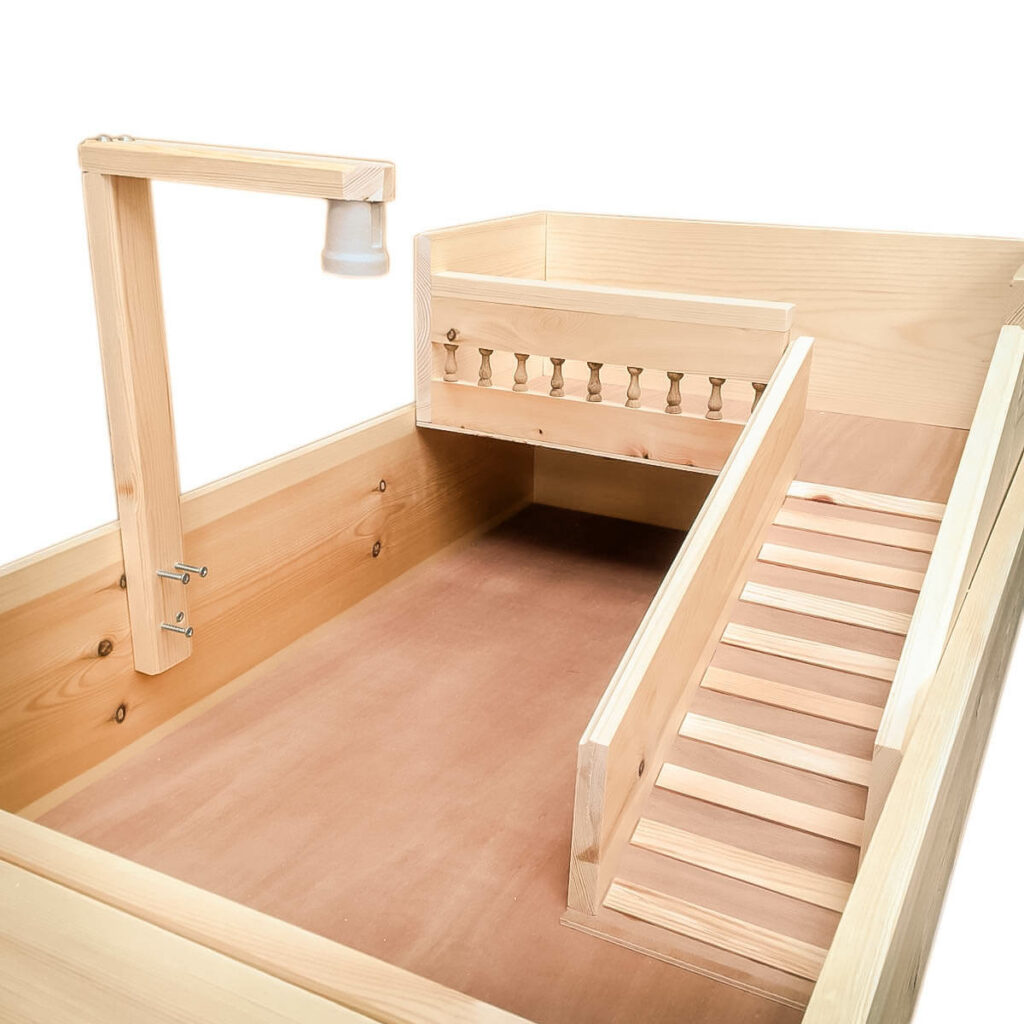
- Most tortoise tables have a ramp that comes with it so that the tortoise can easily climb up into it. It is important to give your tortoise table an incline to make climbing easier.
- You need to choose a surface for your table carefully and make sure that it is not too slippery or too rough; otherwise, your reptile will be uncomfortable when trying to climb on or off of it.
- Make sure that you have left enough space at the bottom of your table so that there will be room for food and water bowls as well as some substrate if you decide to go with substrate substrates other than sand are recommended for desert tortoises).
- Don’t cut the height of your table too short. This is important because tortoises like to climb with their claws and they cannot do so if their table is too short.
Step 2: Gather Your Materials And Tools For The Table
Once you have planned what you want your tortoise table to look like, it’s time to gather the materials and tools that you need in order to create the table. Here is where your decision on the type and shape of table that you want to build comes into play.
The materials and tools includes:
- Wood (Hardwood preferably) - Wood is a natural material that is easy to work with, easy to clean and strong. It will last a long time if properly taken care of, which is why it’s one of the best materials for building tortoise tables.
- Sand Paper - If you are going to use sand substrate, then you will need to sand down the wood so that it resembles the texture of sand.
- 100% Acrylic Plastic (such as Plexiglass) - An acrylic plastic sheet is a good substitute for the Plexiglass in case you are on a tight budget but still want your tortoise table to be crystal clear. You can easily purchase this at most hardware stores.
- Hammer - If you are using a smooth or hardwood, it’s important to use a hammer and nails. If you are using sand substrate, then you will need to drill holes for drainage.
- Screws - The length of the screws will vary by the length of the board that you would like to attach the table together.
- Nails - The length of nails will vary depending on the type of wood that you are using. There should be enough nails for every screw you are using with your table.
- Power Drill - You will need a power drill if you are going to be using screws with different lengths or if you want to drill holes into the sides of your tortoise table for drainage purposes. The power drill will help you create holes at the right depth so that they can drain and dry properly.
- Measuring Tape - The measuring tape is used for checking size and spacing of objects or materials that you are working on.
- Safety Glasses - You will need to protect your eyes from the dust and debris that you create as you work on your tortoise table. Safety glasses can help with this task because they give you 100 percent UV protection while still allowing you to see what you are doing.
- Safety Gloves - These are necessary for protecting your hands from sharp or rough edges and also for reducing the risk of getting cuts or scrapes.
Step 3: Make The Drawings For Your Tortoise Table
Once you have gathered your materials and tools, it is time to make the drawings of your tortoise table. This will help you determine exactly where to attach all of the different parts of the table.
Step 4. Assembling The Wood
Now, it’s time to start assembling the wood for your tortoise table. The most important thing that you need to keep in mind at this point is to make sure that everything is even. This will be easier if you have a square and a saw, but you can do it just as easily with a bit of patience!
Step 5. Making The Frame Of The Table!
If you are making a rectangular or square table, then it will be easier for you. All you have to do is measure the two opposite corners and mark them. You will then have 2 long sides and 2 short sides on your new tortoise table.
Step 6. Sanding The Wood
If you have decided to go with the sand method of substrate, then the wood needs to be sanded down so that it has a texture similar to sand. For desert tortoises, it is best to use play sand, which can be easily found at hardware stores.
Step 7. Attaching The Top And Bottom Boards
Once the wood has been sanded, it is time to attach the top and bottom boards to the frame. These will be the two short ends of your tortoise table.
Once you’ve attached the sides to the frame, then you can attach other parts of your tortoise table. For example, if you want a ramp for your tortoise table, then you should measure out how far it is from one end of your frame to the other.
Step 8. Finishing Up Your Tortoise Table!
Once you have finished attaching the top and bottom boards to the frame, it is up to you how you want your tortoise table to look. For example, you can attach exterior pieces to the table if you would like or leave it just like that. You can also add a heating light if your tortoise table is going to be in an area that gets very cold at night or during certain seasons of the year.
Conclusion
How do you build a tortoise table? Above all, remember that tortoise tables are very durable and can last for many years if properly cared for. Make sure that you do not forget about cleaning the table or that you ask for help when it’s necessary! You can also look into finding a tortoise keeper to help you keep an eye on your tortoises 24/7.
If you are unsure of what size to make your table, then I recommend making a square or rectangular board because they are more versatile. On the other hand, if you want maximum functionality, then a circular board is the best choice because it can be used in just about any situation.

Related posts:
 What Happens to Wood When It Gets Wet?
 Are Gutters Necessary in Texas? It’s not what you think.
 How Long Can a House Go Without Gutters?
HOW TO INSTALL ARTIFICIAL GRASS ON CONCRETE WALL
Key features of a Building automation System
How to use an Impact Driver: A Simple Guide
How Long Can a House Go Without Gutters?
HOW TO INSTALL ARTIFICIAL GRASS ON CONCRETE WALL
Key features of a Building automation System
How to use an Impact Driver: A Simple Guide
